Showing posts with label Vegetables. Show all posts

Monday, December 3, 2012

Roasted Corn with Red Pepper Butter

Recipe: Roasted Corn with Red Pepper Butter
Page: 250
Date Cooked: November 18, 2012

The main portion of this recipe is the red pepper butter. Other than preparing that, all you have to do is roast some corn. Jonathan Waxman instructs roasting the corn with the husks. Unfortunately, due to the end of the season, I couldn't find corn still the husks. Instead I had some fresh corn on the cob. To emulate the corn in the husk technique, I roasted one ear of corn on its own and one ear of corn wrapped in foil. I figured roasted corn in the husk would be somewhere in the middle of those two points.

Ingredients: Corn, jalapeno chile, red bell pepper, butter, garlic, and sea salt

I prepared a fire in my grill and grilled the jalapeno and red pepper until blackened and blistered. I placed the peppers in the bowl, covered it with plastic wrap, and let it steam. I then peeled the peppers with my fingers, stemmed, and seeded them.

Left: Roasted the peppers
Right: Steaming the peppers

I combined the peppers with the butter, garlic, and sea salt in a food processor. I pureed the mixture until the butter was homogeneous. In the meantime, I grilled the corn.

Making red pepper butter

I removed the corn from the grill, slathered it with the red pepper and butter, and served.

Roasted Corn with Red Pepper Butter

Upon further research (i.e. Google images), I discovered that the final roasted corn in the husk product was closer to my foil-wrapped corn, which is the focused image in the final picture. The corn with the red pepper butter was quite delicious. What really worked in this recipe was the juxtaposition of the sweetness of the corn with the heat of the red pepper butter. But the best part was that there was leftover red pepper butter for future use!

Enjoy!

Tuesday, July 31, 2012

Restaurant-Style Vegetables

Recipe: Restaurant-Style Vegetables
Page: 246
Date Cooked: July 29, 2012

This recipe is literally a combination of ten different vegetables. Each blanched separately and then combined. I do want to make a quick note: I couldn't find yellow wax beans and substituted green beans in its place.

Ingredients: Radishes, green beans, red bell pepper, green bell pepper, zucchini, yellow squash, small Yukon gold potatoes, cauliflower, broccoli, unsalted butter, salt, pepper, cherry tomatoes, basil (not shown), and rosemary (not shown)

I began by prepping the vegetables. I trimmed the radishes and quartered them. I topped and tailed the green beans. I stemmed, seeded, and cut the peppers into bite-sized squares. I quartered and cut the zucchini and yellow squash.

Prepping all the vegetables

I brought a large saucepan of salted water to a boil. I added the potatoes and cooked for about 15 minutes. I then added the radishes to the pot and cooked until both the potatoes and radishes were tender. I then drained the pot.

Cooking the potatoes and radishes

I brought another saucepan of salted water to a boil and blanched the green beans, cauliflower, and broccoli.

(1) Blanching green beans (2) Blanching broccoli and cauliflower

I melted butter in a pan, added the peppers and squash, added salt and pepper, and cooked for a few minutes.

Cooking squash and peppers

I added in all the blanched vegetables and cooked for a few minutes longer. Finally, I added in the tomatoes and chopped rosemary and basil. The veggies were ready to serve.

Restaurant-Style Vegetables

I love the picture of the all vegetables and it did look quite beautiful on the plate. However, I found this recipe to be a bit dull. It felt like a filler recipe. There just wasn't much to it. And unfortunately, that's all I have to say.

Enjoy!

Saturday, June 16, 2012

Broiled Eggplant

Recipe: Broiled Eggplant
Page: 255
Date Cooked: June 4, 2012

I really like eggplant. However, it isn't often that I cook it alone. It usually is a component of a dish and never just the side. This eggplant dish is super simple and actually makes for a great side.

Ingredients: Eggplant, olive oil, salt, pepper, and grated Parmesan cheese

I cut the stem ends of the eggplant and sliced it in half lengthwise. I coated the eggplant with olive oil, salt, and pepper. I then placed the eggplant cut side down on a baking sheet and put in the oven to broil. Once the outside turned golden, I flipped the eggplant and cooked until they puffed.

Broiling the eggplants

Once the eggplant was done, I sprinkled it with olive oil, pepper, and grated Parmesan cheese. It was then ready to serve.

Broiled Eggplant

See...super easy! I think the key to this recipe is to pick a great eggplant. A simple veggie side with no fuss and a yummy result.

Enjoy!

Thursday, December 8, 2011

JW Fries

Recipe: JW Fries
Page: 243
Date Cooked: November 12, 2011

The ultimate French fry, an elusive item many of us seek. And I don't think I am alone in saying that it appears almost impossible to achieve the perfect French fry at home. It's as if no matter what I do I can't seem to get it to taste like a restaurant fry. Well Jonathan Waxman claims that his recipe is well, "a pain...but well worth it to achieve the ultimate French fries." As suggested by JW, these French fries are a perfect accompaniment to Grilled (or Broiled) Chicken.

Ingredients: Organic russet potatoes, corn oil, and sea salt

Let me just start off by saying, these French fries really are a pain and require two days, not of actual work, but of planning. First, I peeled the potatoes, placed them in a bowl of ice water, and refrigerated overnight. The whole idea behind potatoes in ice water is to get rid of a lot of the starch that is on the surface of the potato.

Peeled potatoes in ice water

The next morning, I cut the potatoes lengthwise into fries that were about 1/2 inch wide. As I cut the potatoes, I put them in cold water.

Left: Slicing potatoes
Right: Soaking wedges in cold water

In the meantime, I heated the corn oil in a heavy pot. Once the oil was hot enough, I drained the potatoes and patted them dry. I was then ready to simply blanch the potatoes in the hot oil for just a few minutes. Since the potatoes are actually fried twice, I didn't want the potatoes to achieve any kind of color. After blanching, I drained and cooled the fries on paper towels.

Left: Blanching potatoes
Right: Drained and cooled potatoes on paper towels

After I blanched all my potatoes in batches, I spread them onto a baking sheet and refrigerated for almost 6 hours, uncovered.

Blanched potatoes on baking sheet

Finally, the last step was upon me. I brought the French fries to room temperature and also heated the corn oil. I fried the potatoes in batches until they achieved a crisp, golden brown.

Frying potatoes for the second time

I drained the potatoes on a brown paper bag, sprinkled with sea salt, and they were ready to serve.

JW Fries

JW Fries involve a number of steps and heck almost two full days. So the ultimate question is: Was it worth it? ....... Well, I can tell you this...the fries were amazing. I have never been able to achieve that good of a fry at home...ever! They were crispy and yet still had a lot of potato (I'm not the biggest fan of just pure crunch and no potato). There is no doubt that it yielded restaurant quality ultimate French fries.

However, it DID take quite some time to prepare. Regardless of the point that actual cooking time was minimal. Planning this out was a bit of a pain.

So, would I make them again. Honestly, I can't say yes or no. I just don't know. I will say one thing, they did taste damn good with that Grilled (or Broiled) Chicken.

Enjoy!

Sunday, November 27, 2011

Braised Carrots with Saffron

Recipe: Braised Carrots with Saffron
Page: 244
Date Cooked: November 12, 2011

If you ask me, carrots are somewhat of a boring side dish. I like them, but often use them in soups or stews. Accordingly, I didn't have any sort of expectations for this recipe. However, it appears that you only need three items to make carrots exceptionally tasty: 
  1. Saffron
  2. Sherry vinegar
  3. Butter
Ingredients: Carrots, sea salt, olive oil, saffron, sherry vinegar, unsalted butter, and black pepper

I put whole carrots (after I trimmed and peeled them) into a saucepan with some water and salt. I covered the saucepan, brought the items to a boil, and cooked the carrots till al dente. Once cooked, I patted the carrots dry.

Left: Carrots in salt water
Right: Carrots patted dry

I then heated some olive oil in the skillet, added the carrots, and cooked them for a few minutes. I added the saffron and sherry vinegar to the carrots and cooked for a few more minutes. Finally, I added the butter, covered the skillet, and took the pan off the heat for a couple of minutes.

1. Carrots in olive oil 2. Carrots in saffron and sherry 3. Carrots with butter

Finally, I seasoned the carrots with salt and pepper and they were read to serve.

Braised Carrots with Saffron

These were the most delicious carrots I have ever eaten in my entire life. No joke. It was amazing good. The saffron, sherry vinegar, and butter each added their own flavor to the carrots and also worked together harmoniously.  The recipe calls for a mixture of orange and yellow carrots. Unfortunately, I couldn't find an assortment. But I don't think this diminished the dish at all. Furthermore, it was a super fast side dish to whip up. And took little to no effort. Overall, I can't imagine carrots cooked in any better way. 

Monday, October 24, 2011

Mixed Peppers and Onions

Recipe: Mixed Peppers and Onions
Page: 248
Date Cooked: October 17, 2011

I had some leftover bell peppers and wasn't sure what to do with them and this seemed to be a great, easy, and simple recipe to try out.

Ingredients: Assorted bell peppers, olive oil, salt, pepper, sweet onion, garlic, and jalapeno chile

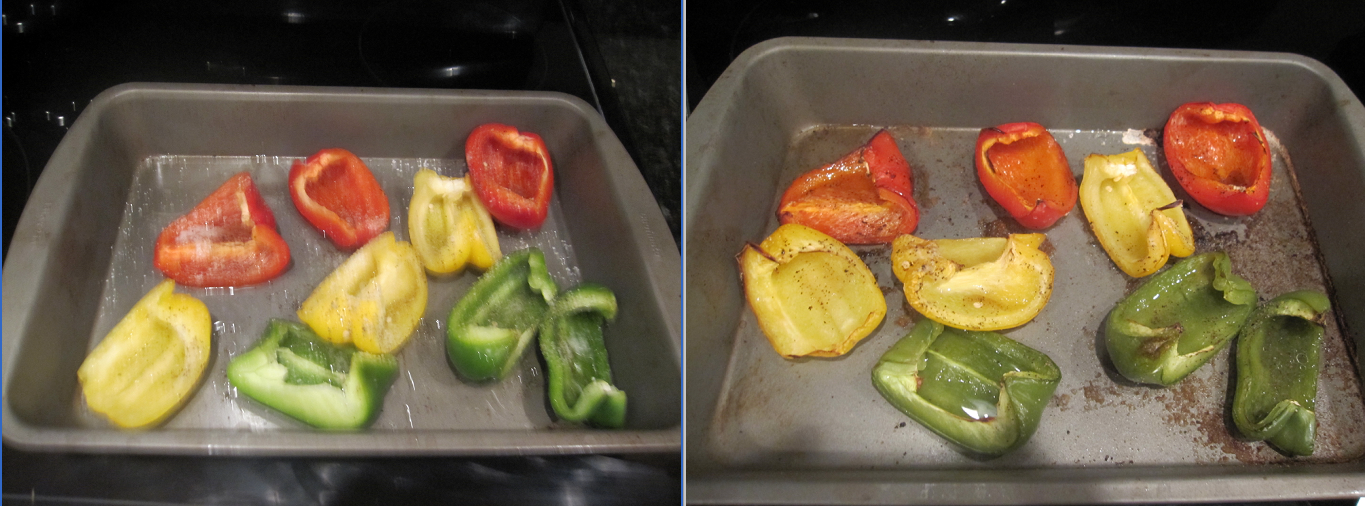
This recipe encompassed roasting the peppers. So I stemmed, seeded, and quartered the bell peppers. I placed the peppers on a baking sheet along with some olive oil, water, salt, and pepper. The bell peppers roasted until tender.

Roasting bell peppers

In the meantime, I diced the onion, minced the jalapeno (after seeding it), and minced the garlic. I heated olive oil in a skillet and cooked the onion, jalapeno, and garlic for a few minutes.

Cooking the onion, jalapeno, and garlic

Finally, I placed the roasted bell peppers in a bowl, added the onion mixture, and tossed well. I seasoned it to taste and it was ready to eat.

Mixed Peppers and Onions

When I read the title of this recipe, I immediately assumed it would just be bell pepper and onions sliced lengthwise and sauteed. But this was quite different. I liked that the peppers were kept in quarters. And it looked quite beautiful in the bowl. Overall, the dish was fine. Nothing to write home about but good.

Enjoy!

Thursday, September 15, 2011

Succotash

Recipe: Succotash
Page: 249
Date Cooked: September 13, 2011

I have to say this upfront because it the first thing that comes to my find when I hear/read the word succotash. I immediately think of Daffy Duck from the Looney Tunes saying "suffering succotash." I'm not sure why succotash is oh so suffer-able, if you ask me...it was just super simple.

Ingredients: Corn, garlic, basil, salt, green beans, yellow wax beans, lima beans, sweet onions, tomatoes, olive oil, butter, and pepper

I think as you cook through an entire cookbook, you really get to know the chef behind the recipes. I've picked up on certain traits or techniques that I believe Jonathan Waxman stands behind. One of these happens to be vegetarian stock made from corncobs - which is done in this recipe and also in a previous recipe.

Accordingly, I husked the corn and cut the kernels off the cob. I placed the corncobs, garlic cloves, basil stems, water, and salt into a pot and allowed it to simmer for some time. Afterward, I strained the stock and brought the broth to a boil (trying saying the last part 3x real fast!).

Left: Making vegetable stock Right: Boiling strained broth

While the broth boiled, I topped and tailed the beans. Diced the onions and tomatoes. And also, smashed the garlic cloves. I also placed the beans into the broth, cooked till al dente, and removed them with a slotted spoon.

1. Diced onions 2. Diced tomatoes 3. Cooking beans in broth

I then pulled out the Dutch oven and heated some butter and olive oil over medium heat. I added corn, onions, garlic, and salt to the casserole and cooked for a few minutes. I then added the beans and cooked it for a bit longer. Finally, I added the tomatoes and basil and cooked just a bit longer.

Succotash in the Dutch oven - after added the tomatoes and basil

After all the vegetables had cooked to perfection (and JW makes a note in the recipe that "the only thing not to do is cook the vegetables until they fall apart), I was ready to plate. I spooned the succotash into a bowl and garnished it with a bit of basil.

Succotash

I've never made succotash before and quite honestly I didn't really know what it entailed. So I learned the following: it is a simple side dish that involves slow braising vegetables and traditionally includes corn and beans (oh and butter). In addition to taste, one thing I truly appreciate is the visual contrast a dish produces. JW's succotash hit the visual aspect right on the dot. It looked beautiful.

And it tasted good as well. I didn't have much of an "ah ha" moment in this recipe but I could see the value in the dish. However, if I made it again...I think I would add bacon. I missed that added dimension of fat and bacon really would have punched it up. All in all, it was an OK recipe. In closing, I suppose I have to say it... "Suffering Succotash!"

Enjoy!

Tuesday, August 30, 2011

Zucchini Blossom Beignets with Sun-Dried-Tomato Mayonnaise

Recipe: Zucchini Blossom Beignets with Sun-Dried-Tomato Mayonnaise
Page: 252
Date Cooked: August 20, 2011

When I first skimmed through JW's "A Great American Cook," I did some mental note taking of the recipes. This recipe in particular stood out to me because I had never seen zucchini blossoms in the grocery store. Accordingly, I have been on the lookout for them for almost a year. However, after doing some reading I found out that they are commonly found at farmer's markets in the summer time. Unfortunately, none of the vendors at my regular farmer's market seemed to carry them. One weekend, I tried out a market I hadn't been to before and there they were! I bought them and decided to make the recipe that very day.

Ingredients: Sun-dried tomatoes, lemon, corn oil, eggs, Balsamic vinegar, tarragon, salt, pepper, flour, lager, olive oil, and zucchini blossoms

First, I placed the sun-dried tomatoes to soak in hot water for some time. While the sun-dried tomatoes soaked, I made the batter. I put flour into a bowl and created a well. I added egg yolks, beer, olive oil, salt and pepper into the well. The entire mixture was blended well and placed on the side to rest.

Making the batter

With the batter now resting, I proceed on to the make the mayonnaise. The prospect of sun-dried-tomato mayonnaise was indeed quite exciting, except of course for the mayonnaise part. However, I've continued to keep trying. I drained the tomatoes and placed them into a food processor to puree. Later, I added the egg yolks, Balsamic vinegar, and lemon juice to pulse. This time in the mayonnaise making process I used an immersion blender. I put all the contents of the food processor into a a bowl and slowly added the corn oil as I continued to blend. Well ladies and gentleman, this is the moment I have been waiting for since the very first time I made mayonnaise......I DID IT! I made mayonnaise that looked like mayonnaise! Not liquid-y at all! Perfect, could have come from a jar, good ol' mayonnaise! I'm not sure if you can tell...but it was quite exciting. I added the tarragon, few drops of balsamic, salt, and pepper to the mayonnaise; covered it and put it in the fridge.


Sun-Dried-Tomato Mayonnaise!


I then focused my attention on the zucchini blossoms. I opened each blossom carefully and removed the stamen. I closed the blossoms back up and put them in the fridge until I was going to fry.

Zucchini blossoms with removed stamens

I beated the egg whites until soft peaks formed and folded it into the batter. With the oil hot and ready in a pan, I dredged the zucchini blossoms through the batter and situated them into the hot oil until they were nicely browned. I used a slotted spoon to remove the blossom and allowed them to drain on some paper towels.

Frying up zucchini blossoms

Finally, I served the zucchini blossoms alongside the sun-dried-tomato mayonnaise.

Zucchini Blossom Beignets with Sun-Dried-Tomato Mayonnaise

I really felt that this was a bit of a treat. Not to mention, I was still running on the high of actually making mayonnaise. I did enjoy the beignets, but as light as the batter was, I thought it was too heavy for the delicate blossoms. When I later read the intro to this recipe, JW also suggests "[stuffing] the blossoms with finely minced zucchini with a few herbs and olive oil or a little chopped tomato mixed with a good soft goat cheese." And when I think about it, that suggestion could have been the trick to my feeling so torn. Moreover, in the past when I was served zucchini or squash blossoms, they are often stuffed with something. Regardless, it was still a beautiful summertime treat.

The sun-dried-tomato mayonnaise paired excellently with the zucchini blossoms. The mayonnaise provided additional salt and acidity. Speaking of the mayonnaise, I began wondering that perhaps I was so successful in producing mayonnaise this time around because the recipe called for corn oil rather than olive oil. My understanding is that corn oil has a larger unsaturated to saturated fat ratio than olive oil and perhaps this was the reason the mayonnaise thickened faster. Nonetheless, my theory on the mayonnaise will continue to develop as I continue to delve into these recipes.

Enjoy!

Thursday, April 21, 2011

Late-Autumn Vegetable Casserole

Recipe: Late-Autumn Vegetable Casserole
Page: 247
Date Cooked: April 4, 2011

The great part of cooking in today's world is that you don't necessarily have to wait for a specific season to arrive in order to eat your favorite assortment of vegetables. And though it is technically spring, here in Central PA we are still getting glimpses of winter and this casserole seemed to fit the weather the perfectly.

Ingredients: Butternut squash, olive oil, salt, pepper, white button mushrooms, onion, garlic, leeks, celery root, rosemary, thyme, chives, San Marzano plum tomatoes, fresh bread crumbs, Parmesan cheese

The first task was to roast the squash. It was rubbed down with some butter and seasoned with salt and pepper and placed in the oven to do its thing. In the meantime the following was accomplished: Chopped onions and mushrooms; Smashed garlic; Chopped leeks, celery root, tomatoes, and herbs. I had never used celery root before this recipe and found the peeling process to be quite tedious. The surface isn't smooth at all and proved to be quite difficult.

From Left to Right: Squash before roasting; Chopped mushrooms; Chopped onion
From Left to Right: Smashed garlic; Chopped leeks; Chopped celery root

In a Dutch oven with some hot olive oil, (1) the onions, garlic, leeks, and celery root are all cooked together. After the vegetable appear tender, (2) the mushroom is added and cooked for a minutes as well. The (3) roasted squash is then added to the vegetables. Finally, (4) the tomatoes, herbs, and some salt and pepper to taste join the Dutch oven.

Vegetable cooking process - Panel goes with steps listed in previous paragraph

Finally, the casserole is sprinkling with bread crumbs and grated Parmesan and is baked until golden brown.

Late-Autumn Vegetable Casserole

This casserole smelled like Thanksgiving! And it was delicious! None of the vegetables were overcooked (so yay Jonathan Waxman recipe directions) and each of them provided a great textural contrast. I also really enjoyed the celery root - it was quite yummy. I'm not sure what else I can say about this casserole, other than the fact that this will be on my table this Thanksgiving for all to consume!

Enjoy!

Sunday, October 17, 2010

Steamed Artichokes with Garlic Mayonnaise

Recipe: Steamed Artichokes with Garlic Mayonnaise
Page: 251
Date Cooked: October 5, 2010

When I started this project I realized that the task was daunting - cooking every recipe takes time and dedication. However, the one thing that put me at ease was the vegetable recipe section in "A Great American Cook," where the directions are short and sweet.

This vegetable section recipe included steaming artichokes and making my own mayonnaise - both firsts for me.

Ingredients: Artichokes, lemon, flat-leaf parsley, olive oil, egg yolks, sea salt, garlic
The only time I eat artichokes are when someone else prepares them. And I do enjoy them. While I have bought artichokes from the store on numerous occasions, they tend to stay in my fridge until I throw them out. All because I never really knew what to do with a whole artichoke and was somewhat intimidated to prepare them. However, I can safely say that after this recipe I no longer feel that way!

To steam artichokes was just so simple and I'm somewhat disappointed no one informed me of this sooner. I cut about one inch from the top of the artichoke, trimmed down each leaf, and then cut the stems so they would stay upright in the steamer basket. They were then placed into a pot to steam for about 40 minutes.

Artichokes ready to be steamed.

While the artichokes steamed, I began making the mayonnaise. The juice of the lemon, chopped parsley leaves, egg yolks, and salt were all combined into a bowl and then whisked for 3 minutes.

Left: Lemon juice, parsley, egg yolks, and salt
Right: Components after being whisked for 3 minutes
Then came the difficult part of the mayonnaise making process: adding the olive oil. The olive oil is initially added a few drops at a time till the sauce emulsifies. It is then carefully drizzled at a slow pace to avoid curdling. The garlic is then added to the sauce.

Simultaneous whisking and olive oil drizzling. 
I thought I had the followed the directions just as they had been laid out in the recipe. Unfortunately, my mayonnaise never did look like mayonnaise. It did thicken, but it never had the light and fluffy texture that I wanted.

Garlic Mayonnaise

Though the mayonnaise didn't have the right consistency, I did end up with perfectly steamed artichokes and used the "mayonnaise" for dipping. Despite the incorrect texture, the mayonnaise mixture was delicious! It also went perfectly with the artichokes. The sauce gave the perfect amount of acidity one would want with steamed artichokes. Furthermore, the lemon juice, parsley, and garlic produced an amazing flavor.

All in all, I decided I have to give mayonnaise making another try (and luckily for me, this isn't the only time Jonathan Waxman calls for making mayonnaise). Again in spite of not producing a perfect mayonnaise - it still turned out to be a tasty dish. And, hey, I'm not afraid of preparing artichokes anymore!

Enjoy!