Tuesday, August 2, 2011

Soft-Shell Crab and Aioli Sandwich

Recipe: Soft-Shell Crab and Aioli Sandwich
Page: 102
Date Cooked: July 29, 2011

Jonathan Waxman opens up this recipe recollecting his first crab po' boy - french roll, spicy mayo, and deep-fried crab. This recipe was his spin on that sandwich but with a few modifications - roll, aioli, and roasted soft-shell crab. Considering the last JW soft-shell crab recipe I made was such a success, I was excited to see what he had in store for this one.

Ingredients: Soft-shell crabs, orange, garlic, olive oil, white wine, paprika, egg yolks, salt, and rolls

The first step was to create the marinade for the crabs. I combined the orange juice, olive oil, white wine, minced garlic, and paprika into a bowl. I then tossed the crabs in the marinade and placed them in the fridge.

Soft-shell crabs in the marinade

While the crabs marinated, I decided to attack the aioli. I pureed the egg yolks and garlic, added the salt, and then dribbled in the olive oil until the sauce began to emulsify. I have been struggling through a number of recipes to perfect my mayonnaise and aioli making skills. And though this aioli definitely was not perfect, I can see that it is getting there.

Aioli

With the oven pre-heated, I placed the crabs on a baking sheet and they roasted until golden brown and cooked through.

Roasting soft-shell crabs and turning once

Once the crabs were roasted, I cut them into pieces, tossed them in the aioli, and placed them on the buns.

Soft-shell crab and aioli sandwich

So I have to say I was a tad bit disappointed with the sandwich. The soft-shell crab itself was amazing and tasted delicious roasted. But the sandwich fell flat. It needed another flavor dimension or texture. I think the recipe was on the right track but it just didn't do it for me.

Enjoy!


Sunday, July 31, 2011

Turkey Breast Milanese

Recipe: Turkey Breast Milanese
Page: 152
Date Cooked: July 23, 2011

Out of the 11 categories in "A Great American Cook," the one category I was least excited about was the poultry section. In my view, chicken and turkey aren't necessarily the most exciting things to cook. And also my love for seafood far exceeds how I feel about poultry. However, after making JW's "Turkey Breast Milanese" I may have to rethink the way I see poultry. Moreover, I am now a little more excited to see what else this section of the cookbook has in store.

To be called a Milanese, all one needs to do is dip the food into egg and breadcrumbs (sometimes Parmesan cheese) and then fry it in butter. So really...you can't go terribly wrong.

Ingredients: Boneless turkey breast, eggs, salt, olive oil, all-purpose flour, pepper, country bread, lemon, cherry tomatoes, basil, butter, mesclun, capers, green olives, and red wine vinegar

My grocery store actually sold turkey breast fillets, so I didn't have to go about removing the skin or even cutting it into fillets. I simply moved right on to pounding the fillets (wrapped in plastic wrap) until they were each about 1/4 inch thick.

Pounding turkey breast fillets until about 1/4 inch thick

I combined the eggs, salt, and olive oil into a bowl and beat those. I also then placed flour into a large bowl and seasoned it with salt and pepper. One at a time, I placed each fillet into the flour and then into the egg mixture. All the fillets stood like this in the refrigerator until time.

Turkey breast Milanese assembly line

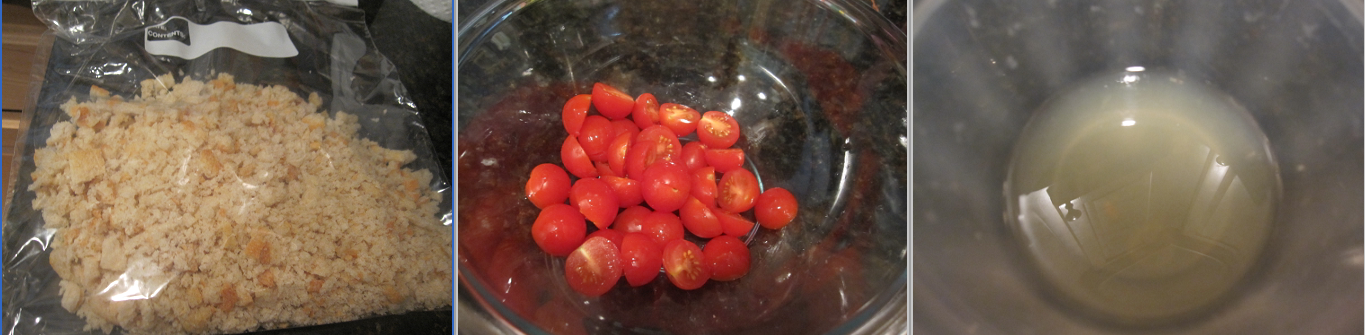
While the fillets stood in the fridge, I turned my attention to the prep work. I placed the bread into a food processor to make bread crumbs, juiced the lemon, halved the cherry tomatoes, and cut the basil.

1. Bread crumbs 2. Halved cherry tomatoes 3. Lemon juice

I then proceeded to prepare the salad. I tossed the mesclun, tomatoes, basil, capers, and olives together. Furthermore, I whisked some olive oil, red wine vinegar, and salt together for the vinaigrette.

Mesclun salad

I then placed one fillet at time into the bag of bread crumbs, enough to coat the fillet thoroughly. In a large skillet, I combined butter and olive oil and then added the fillets to cook until golden brown on each side.

Frying up the breaded fillets

Once all the fillets were cooked, I wiped out the skillet and melted butter and then added lemon juice to create a lemon-butter. I poured the lemon-butter mixture onto the fillets and then proceed to plate by topping them with the salad (mixed with the vinaigrette). Apparently, topping the Milanese with the salad is traditionally how it is served.

Turkey Breast Milanese

I do not have a single complaint about this recipe. It was simple, straight forward, and delicious. The Milanese on its own (without the lemon-butter) tasted wonderful. Perfectly cooked and perfectly seasoned. And then of course the lemon-butter added additional fat and acid. However, the mesclun salad with the vinaigrette was amazing. I couldn't get enough of the salad. I actually had to make more later on because I caught myself just eating the salad on its own.

Yet, the two components together just sang. It was a wonderfully homey meal and yet completely refined. There is no doubt that I will be making this again. Heck, blogging about it now is making me hungry!

Enjoy!

Saturday, July 23, 2011

Corn Soup with Saffron

Recipe: Corn Soup with Saffron
Page: 56
Date Cooked: July 21, 2011

I love the time of the year where you walk into the produce section and see that large table full of corn. There are a number of items that make me think of summer and ears of corn happen to be one of them. With the inspiration of corn in mind, I immediately decided that this was the recipe to make. I don't think Waxman has many "purely" vegetarian recipes in this book, but this is one of them. Heck if you replace the butter and leave out the heavy cream - it's even vegan friendly.

Ingredients: Corn, dried red chile, parsley, garlic, sweet onion, butter, cilantro, saffron, heavy cream, salt, and pepper

The soup stock was purely corn. It consisted of the corncobs, the dried red chile, parsley, and garlic. I placed all these items into a pot with some water and let it simmer for a few hours. After it was done, I strained the stock and placed it on a side.

Corn stock - corn cobs, dried red chile, parsley, and garlic.

With the stock done and out of the way, I proceeded to focus on the other components of the soup. I thinly sliced the onion and cooked it with half the corn kernels and some butter just until the onions were tender. I placed all the stock (except for about 1/2 cup) into the pan with the corn and onions. Finally, I added cilantro and let the whole thing simmer.

Left: Onions, corn, and butter
Right: Onions, corn, corn stock, and cilantro simmering

While the soup simmered, I combined the reserved 1/2 cup of corn stock and a few saffron threads into a small pan and it simmered for a few minutes. I then removed it from the heat and let it cool completely. With the aid of an electric mixer, I beat the heavy cream until soft peaks were visible. Then on a lower setting, I slowly drizzled the saffron stock into the cream mixture. The saffron cream was then placed in the fridge.

From Left to Right: 1.Saffron stock 2.Heavy cream + saffron stock 3.Saffron cream

I put the remaining corn kernels and some butter in a skillet to cook over medium-low heat. The kernels were seasoned with salt and pepper.

Corn kernels cooking on low heat

Finally, I pureed the soup with an immersion blender and strained it into a clean saucepan. The cooked corn was added to the soup and the entire thing was brought to simmer and seasoned with additional salt and pepper. I placed the soup into a bowl and topped it with the saffron cream.

Corn Soup with Saffron

The verdict...it was good...not great, but good. The recipe took some time and had I made the stock in advance the whole thing may not have felt soo tedious. Having said that, I have to acknowledge the fact that I think the corn stock is THE reason why the corn flavor is soo intense in the soup. You consistently taste corn and not only that but multiple dimensions of corn flavor. Layer one is the corn stock. Layer two is the soup itself. And layer 3 are the additional cooked kernels of corn in the soup. It just keeps coming back to you and your taste buds. When I ate the leftover soup the following day, I thought the flavors accentuated even further.

What about the saffron cream, you ask? Well that was pretty amazing! Not sure how you can go wrong with heavy cream and a saffron infused stock. For me, saffron immediately brings to mind Indian cooking, so I somewhat felt that the soup was a strange infusion of Southwest America + India. But it worked.

All in all, it felt a bit tedious. I'm not sure if I would make the recipe again in its precise form...but it definitely gave me a few good ideas.

Enjoy!

Tuesday, June 21, 2011

Seafood Ceviche

Recipe: Seafood Ceviche
Page: 36
Date Cooked: June 3, 2011

Central Pennsylvania has had a loooonnnnggg winter and when we skipped over spring completely and entered summer, I wasn't too disappointed. I was ready for the warm sun and I was ready for cold dishes - dishes with exceptionally fresh ingredients and bursts of flavor. One of the very first items that came to mind was ceviche. If I was still in Florida I would immediately know where to go to get some great ceviche. However, central PA isn't ceviche central and so I turned to my other option....a JW recipe.

I've never made ceviche before but I of course understand the basic concept. You let the acid from the citrus "cook" the fish - making it OK to eat raw. However, preparing a raw item on my own can be somewhat nerve-wrecking. I tend to be incredibly careful, so I bought the fish the day of and it remained in the fridge until the very last step.

Ingredients: Orange, tangerine, grapefruit, lime, lemon, red bell pepper, green bell  pepper, jalapeno chile, red onion, garlic, scallops, shrimp, salmon, cilantro, olive oil, salt, pepper, and chives.

Quite honestly, this dish was easier than I had expected. It really is just about slicing and dicing the ingredients. I began by slicing the tops and bottoms of the citrus and using a knife to cut the peels, following the contours of the fruit. I then removed each segment and placed all the citrus into a bowl. Finally, I juiced the lime and lemon into the same bowl as the citrus sections.

Peeling the citrus, while following the contours of the fruit

With the citrus out of the way, I moved onto coring, stemming, seeding, and dicing the bell peppers and the jalapeno. I also minced the onion and the garlic.

From Left to Right: Diced red bell pepper, Diced green bell pepper, and Diced jalapeno

I removed the fish from the refrigerator. I began by peeling and deveining the shrimp. I then cut the shrimp, scallops, and salmon.

Ceviche mise en place

With my mise en place ready, it was time to put the ingredients together. I added the bell pepper, jalapeno, onion, garlic, cilantro, olive oil, salt, and pepper to the citrus bowl. I then added the fish - salmon, shrimp, and scallops to the bowl and stirred. The ceviche was covered and placed in the refrigerator to marinate.

After its time in the fridge, I removed the ceviche using a slotted spoon. Finally, I placed some minced chives on top for garnish.

Seafood Ceviche

I took Jonathan Waxman's suggestion and made sure to pair the ceviche with an ice cold beer and let me say I think it made for a pretty good meal. My only complaint was that the citrus segments, particularly the grapefruit, were quite large and didn't seem to go well with the small dice of the rest of the ingredients.

Also, a few days prior to this recipe I was inspired to make a version of Jonathan Waxman's Guacamole and Fresh Chips (a recipe I already made), the fresh chips paired really well with the ceviche. The chips gave a crunchy and salty component that wasn't in the ceviche - all while fitting the theme of the meal.

But there is no doubt that ceviche is a great summertime dish and that this recipe has its merits. Would I make it again - YES but with a few minor adjustments.

Enjoy!

Ceviche on Foodista

Tuesday, June 7, 2011

Veal Chops with Roasted Pearl Onions

Recipe: Veal Chops with Roasted Pearl Onions
Page: 189
Date Cooked: June 1, 2011

According to Jonathan Waxman, "chops are the quintessential American cut of meat." While I'm not sure what the statement is based on but if the statement is indeed true, I suppose it makes sense that the recipe is in a book called "A Great American Cook."

Ingredients: Rosemary, lemon, butter, salt, pepper, pearl onions, veal chops, balsamic vinegar

The first part of this recipe entailed making a rosemary-lemon butter. I hadn't done this before and was surprised by its simplicity. However, because it was my first time, the butter wasn't as "pretty" as I would have liked. I mashed the butter in a bowl and then added lemon juice, rosemary, salt, and pepper. I then formed the butter into a log, but it into equal parts, wrapped it in plastic, and put it in the freezer.

Rosemary-lemon butter

I then began prep for roasting the onions. The onions were tossed together with rosemary, butter, salt, and pepper. Afterward, I created a package using parchment paper - rolling up the edges to seal, and placed the pearl onions in the oven to roast.

From Left to Right: Pearl onions tossed with rosemary, butter, salt, and pepper; Package of peal onions; After roasting

Once the onions were done roasting, I let them cool, and then proceed to peel the pearl onions. JW makes reference to "juices" that will be in the packet and placing them into a skillet. When I opened the package, there wasn't any liquid at all. Nonetheless, I proceeded as usual.

Peeled pearl onions

The chops were the easiest part of this recipe. They were seared on each side for a few minutes and then placed in the oven to roast for a bit.

Searing the veal chops

While the veal chops rested after being roasted in the oven, I finished preparing the pearl onions. I added balsamic vinegar to the skillet of pearl onions and heated through. Finally, I was ready to plate the veal chops, the pearl onions, and the rosemary-lemon butter.

Veal Chops with Roasted Pearl Onions

The dish was simple and tasty. I actually really enjoyed the roasted pearl onions and they could have easily been my favorite part of the meal. However, peeling all those onions was no fun task. There must be an easier way. The veal came out perfectly. I think I ended up with a really nice sear on both sides! Finally, the pat of rosemary-lemon butter on top = delicious.

BUT I need to make an important point about the butter. Jonathan Waxman is cuhrazy if his butter proportions are correct. The amount of butter shown in the picture is half the amount of butter he suggested (and even that was too much). Don't get me wrong...I love butter. I think it makes everything incredibly delicious. But, I also would like to avoid clogged arteries. I suppose that would be my 1 major criticism of this recipe. Nonetheless, I kept the remaining butter in the freezer and plan on using it for something else.

Enjoy!

Friday, June 3, 2011

Steak Tartare with Melted Raclette and Potatoes

Recipe: Steak Tartare with Melted Raclette and Potatoes
Page: 170
Date Cooked: May 29, 2011

Tartare is said to be named after the nomadic Tartar people of Central Asia. The legend is that they ate raw meat as they rode their horses and the meat was kept under their saddles in an effort to tenderize it during the day. Similarly, I believe this is also the legend behind the burger. Nonetheless, though the Tartar people may have given barbaric vibes, eating raw meat and all, I think they were on to something!

Ingredients: Filet mignon, red potatoes, olive oil, salt, pepper, shallots, garlic, lemon, jalapeno chile, serrano chile, red onion, parsley, tomato, lime, raclette cheese, and Tobasco sauce

I believe any tartare preparation is really about the knife work. You want that perfect dice on the meat as well as the assorted vegetables and herbs. The key is to have everything be as small and even as possible in an effort to really enjoy all the components of the tartare. With all that in mind, the first step was to dice the meat and let the potatoes boil.

Diced filet mignon

While the potatoes cooked in boiling water, I went right to work on mincing the shallots, garlic, chiles, onion, tomato, and parsley.

Top: Shallots; Garlic; and Chiles
Bottom: Red onion, Tomato, Parsley

With all my ingredients minced and ready to go, I proceeded to finish the tartare. I first mixed the meat with salt and pepper. I then added the shallots and garlic. Thirdly, I added lemon juice and some Tobasco sauce. As I was nearing the end stages of tartare preparation I placed the sliced potatoes under the broiler until they began to brown. I then sprinkled them with the raclette cheese and put it back under the broiler for the cheese to melt.

Browned slices of potatoes

While the cheese melted, I began plating. A mound of the tarate was put on each plate and topped with the minced chiles, onion, parsley, and tomato. Finally, I took the potatoes with melted raclette out of the broiler, put them on the plates.

Steak Tartare with Melted Raclette and Potatoes

I was really happy with the tartare. It had just the right amount of salt and pepper, while the acidity of the lemon juice, lime juice, and tomato worked perfectly. Also, I am a huge fan of the spiciness factor and thought that the Tobasco, jalapeno, and serrano gave the tartare a right amount of kick.

But the best bites were those taken along with the potatoes and raclette. I had never tried raclette before and was surprised by how well the mild, nuttiness of the cheese went with the potatoes (just in case you were wondering, raclette is a semi-soft cow's milk cheese that is commonly used for melting). Nonetheless, the beef and potatoes were in harmony and I truly enjoyed the dish. Who knew I was a meat and potatoes kind of gal?

Enjoy!

Wednesday, June 1, 2011

Soft-Shell Crabs with Spicy Peas

Recipe: Soft-Shell Crabs with Spicy Peas
Page: 235
Date Cooked: May 25, 2011

Well everyone...they're here! It's soft-shell crab season and the moment I saw them at the fish counter I immediately remembered that JW happened to have a few recipes in "A Great American Cook" that needed this ingredient. A soft-shell crab (a.k.a. blue crab) is simply a crab that has recently molted their old exoskeleton. Thus a real time saver when you think about the fact that you get to just bite right into it! Yep, no cracking any shells - just immediate crab.

Of course the recipe calls for live crabs and even outlines the instructions on how to go about cleaning them on a different page (page: 102). Luckily for me, I could get my "fishmonger" (a Jonathan Waxman term) to clean them for me. Moreover, it appears that I have many firsts during this project and this was the first time I personally cooked a soft-shell crab.

Ingredients: Soft-shell crabs, fresh peas, lemon, unsalted butter, red pepper flakes, and salt

The first step was to shuck the peas, which of course took more time than I would have liked. The recipe gives you the option to use frozen peas and that is definitely something to keep in mind for next time. Regardless this was the only real laborious portion of the recipe.

Shucked peas

With the hard work behind me, I then focused on the crabs. I melted some butter in a skillet and once it stopped foaming, I added the crabs top side down. After a few minutes, I flipped the crabs, added the peas, red pepper flakes, and some salt.

From Left to Right: Soft-shell crabs; Crabs in butter; Flipped crabs with peas, red pepper flakes, and salt

Once the crabs were cooked, I removed them from the skillet and put them on plates. Upon turning off the heat, I added some more butter to the peas and red pepper flakes. And then I finally topped it off with some lemon juice. I then spooned the sauce and peas over the crab and I was done.

Soft-Shell Crab with Spicy Peas

I need to emphasize how incredibly quick and easy this recipe really was. Had I used frozen peas...it would have taken 10 minutes tops! It was ridiculous how quickly this meal came together. The kick from the red pepper flakes with the buttery-lemon sauce = amazing. Furthermore, the peas complimented the crab perfectly. The crab was also a no-brainer to make.

Cooking a certain kind of shellfish for the first time (or cooking anything for the first time) comes with a bit of anxiety; and I was pleasantly surprised to find out how easy it was to make soft-shell crab. There is no doubt in my mind that I would make this again. It was quick, simple, and delicious! Heck it even looks beautiful on the plate!

Enjoy!