Monday, October 29, 2012

Smoked Salmon, Quail Eggs, and Endive

Recipe: Smoked Salmon, Quail Eggs, and Endive
Page: 91
Date Cooked: October 25, 2012

The combination of potatoes, smoked salmon, and eggs is pretty typical. This recipe just ups the ante, particularly with the use of quail eggs and endive. Jonathan Waxman mentions a few locations to get quail eggs, such as Chinese supermarkets or a specialty store like D'Artagnan (http://www.dartagnan.com/). While D'Artagnan is great for many products, my advice to you is to definitely go to the Chinese supermarkets if you can. A pack of 15 quail eggs will cost you almost $9.00 from a specialty store. Yet a pack of 10 quail eggs at the Chinese supermarket cost only $1.50. A price differential you just can't beat.

Ingredients: Red potatoes, unsalted butter, salt, pepper, lemon, rice wine vinegar, olive oil, Belgian endive, smoked salmon, quail eggs, and dill

I washed the potatoes and cut them into wedges. I put butter in a skillet to melt, added the potatoes, seasoned them with salt and pepper, and put the skillet in the oven for the potatoes to roast.

Roasting potatoes

In the meantime, I prepped the vinaigrette. I juiced the lemon in a bowl, added rice wine vinegar, and whisked in the olive oil till the vinaigrette emulsified.

Making the vinaigrette 

I cut the bottom ends of the endive and arranged the spears around the plate. I spooned some of the vinaigrette onto the endive spears and placed the salmon on top of the endive. I tossed the roasted potatoes in the remaining vinaigrette and added the potatoes to the plate.

Assembling the salad

Then it was on to frying the quail eggs. I fried them in a pan with some butter, just until the yolks set.

Frying quail eggs

I placed the fried quail eggs on top of the salad and served immediately.

Smoked Salmon, Quail Eggs, and Endive

The salad was good. The salmon really shined and I enjoyed the tartness of the vinaigrette. I also have grown to appreciate potatoes in a salad, something Jonathan Waxman has done before (Warm Dandelion, Bacon, and Potato Salad). Furthermore, the quail eggs did have a different taste and texture when compared to chicken eggs.

The most time consuming aspect of this recipe for me was handling the quail eggs. The small size of the egg makes it a bit tricky. But after a few eggs, I seemed to have gotten the trick.

Overall, it was a great salad. However, I'm not sure I would go to the hassle of using the specialty ingredients if I played with these flavor profiles in the future. Perhaps a different type of lettuce would be fine and a chicken's egg would also be suitable.

Enjoy!

Tuesday, October 23, 2012

Lamb T-Bones and Eggplant

Recipe: Lamb T-Bones and Eggplant
Page: 185
Date Cooked: October 22, 2012

This recipe follows a pretty common pairing - lamb and eggplant. And if it's not broke, why fix it? Furthermore, the recipe includes additional typical ingredients paired with lamb - eggplant and red wine. I may be getting to the punchline early, but the recipe is simple and ingredients really get a chance to sing.

Ingredients: Onion, garlic, Zinfandel, olive oil, lamb T-bones, parsley, rosemary, eggplant, Kosher salt, and black pepper

I sliced the onion and smashed the garlic. I put Zinfandel, olive oil, and garlic in a large bowl and mixed it together. I added the lamb t-bones to the bowl and turned to coat with the marinade. I sprinkled the onion, a few sprigs of parsley and rosemary to the bowl. I let the lamb marinate for 3 hours in the fridge, turning the lamb twice.

Marinating the lamb

I prepped the grill. I cut the eggplant in half, coated it with olive oil, and sprinkled with salt and pepper.

Prepping the eggplant

I grilled the eggplant halves, cut side down for a few minutes. While the eggplant remained on the grill, I patted the lamb t-bones dry and seasoned them with salt and pepper. I then turned the eggplant over on the grill and added the lamb t-bones. After a few minutes, I turned the t-bones over. The t-bones cooked until medium-rare.

Eggplant and lamb t-bones on the grill

I removed the eggplant and lamb t-bones off the grill. I let the lamb rest for a few minutes and then plated. I placed an eggplant half and two lamb t-bones (they were small) on a plate.

Lamb T-Bones and Eggplant

Simple. Simple. Simple. The seasoning was really just salt and pepper, and it worked. The eggplant was great and I loved the beautiful grill marks. The lamb t-bones were cooked to perfection - perfectly medium-rare, tender, and juicy. Like I said at the start of this post, this recipe was really about the pureness of the ingredients. I enjoyed it thoroughly!

Enjoy!

P.S. I cannot believe it, this is my 100th recipe!!! Only 15 more to go!!!

Thursday, October 18, 2012

BBQ Chicken and Grilled Asparagus

Recipe: BBQ Chicken and Grilled Asparagus
Page: 150
Date Cooked: October 14, 2012

The ingredients for this recipe were quite simple. Also, it felt like a healthy meal. Or at least in Jonathan Waxman terms, fairly healthy. I enjoyed Jonathan Waxman's recipe for Perfect Roast Chicken so I was excited about bbq-ing a whole chicken as well.

Ingredients: Chicken, Kosher salt, pepper, green beans, olive oil, asparagus, new potatoes, red wine vinegar, frisee lettuce, and unsalted butter

First, I prepared my charcoal grill. I then proceeded to butterfly the chicken and rubbed it with salt and pepper. I snapped the tough parts of the asparagus stalks. I also cleaned the potatoes. I placed the chicken skin side down on the grill and arranged the potatoes and asparagus around it. I covered the grill and let it cook.

Prep for the grill

In the meantime, I brought a pot of salted water to a boil. I topped and tailed the green beans and then cooked them in the boiling water for a few minutes. Once cooked, I tossed the green beans with some olive oil.

Cooking the green beans
I removed the asparagus from the grill and turned the potatoes. I mixed together the red wine vinegar and oil. I seasoned the vinaigrette with salt and pepper. I tossed the beans and frisee with the vinaigrette. I also tossed the asparagus with some butter and seasoned them with salt and pepper.

Left: Grilled asparagus tossed in butter
Right: Green beans and frisee salad

I pulled the chicken and potatoes off the grill as well.

BBQ chicken and potatoes

I then got ready to plate. I cut the chicken into pieces. I placed the bean and frisee salad on a plate, topped it with a piece of chicken. Finally, I set some potatoes and asparagus on the plate as well.

BBQ Chicken and Grilled Asparagus

The chicken was delicious - cooked perfectly and had this great grill flavor. The vinaigrette in the frisee and green bean salad provided the acidity for the meal. And the buttered asparagus gave some fat to the dish. But really, I thought it felt balanced and very all-American. I definitely will be bbq-ing a whole chicken again! It was almost too easy - butterfly the chicken, place it on the grill - skin-side down, and let it cook. All in all, simple and yummy.

Enjoy!

Tuesday, October 9, 2012

Grilled Rabbit with Roasted Tomato Salsa

Recipe: Grilled Rabbit with Roasted Tomato Salsa
Page: 194
Date Cooked: September 28, 2012

I'm not sure how popular rabbit cooking is for the home cook or perhaps it's a regional thing. However, it is safe to say I hadn't cooked rabbit prior to this recipe. I had to special order the rabbit from my grocer (I later found out that the Amish families at the farmers market sometimes have it), waited a week for it to arrive, and was quite excited for this recipe.

Shallots, garlic, rose wine, olive oil, rosemary sprigs, rabbit, plum tomatoes, Kosher salt, black pepper, and unsalted butter

The recipe called for the rabbit to marinate for 12-48 hours. Accordingly, upon getting the rabbit (already cut into pieces by my butcher) I went right to marinating. I sliced some shallots and peeled half a garlic head's worth of cloves. I combined the wine, the shallots, garlic, olive oil, and rosemary in a large bowl. I added the rabbit pieces, covered with plastic, and let it marinate in the fridge.

Rabbit in the marinade

Two days later, I resumed the recipe. I cut the tomatoes in half, sprinkled them with salt and pepper, topped them with the rest of the garlic, some more shallots, minced rosemary, and olive oil. I placed the pan of tomatoes in the oven to roast. Upon removing the tomatoes from the oven, I transferred the contents to a bowl, and crushed the tomatoes with a wooden spoon.

Roasted Tomato Salsa

Then it was time to grill the rabbit. I removed the rabbit from the marinade, rubbed the rabbit pieces with olive oil, and seasoned it with salt and pepper. I placed the rabbit on the grill and let it cook for about 20 minutes - 10 minutes on each side.

Grilling the rabbit

In the meantime, I heated some olive oil in a pan, added the garlic and shallots from the marinade, and sauteed until they became brown. I then poured in the reserved marinade, additional wine, and let the it boil. I strained the wine mixture into another saucepan and reduced it to about a cup. I finished the wine reduction with some butter.

Making the wine sauce

Then it was time to plate. Jonathan Waxman suggests serving the rabbit with buttered fettuccine. I happened to have made fettuccine earlier that week and this was a perfect use of it. I placed some fettuccine on a plate, added the rabbit, spooned the wine sauce over the rabbit, and garnished it with the tomato salsa.

Grilled Rabbit with Roasted Tomato Salsa

This was such a fun recipe to make; and when you look at it, it didn't take too much work. The most time intensive part was the marinating and heck you don't have to do anything while it marinates. But the flavors are so complex. I loved the gaminess of the rabbit and it definitely had that wonderful grill flavor. The wine sauce was delicious and it added a bit of sweetness and fat to the dish. The roasted tomato salsa was incredibly flavorful, I could have just eaten the salsa on its own. As a result of each component being great, the dish as a whole was soo freaking good. It was without a doubt restaurant quality material!

Enjoy!

Sunday, September 30, 2012

Angel Food Cake with Toffee Crunch

Recipe: Angel Food Cake with Toffee Crunch
Page: 272
Date Cooked: September 29, 2012

All of the components of this recipe were "firsts" for me. I had never made angel food cake, toffee, or butter cream icing before. Accordingly, I didn't have much to go off of, other than having tasted these items previously. While I don't want to spoil the ending... the one thing I discovered is I think I will be investing in a candy thermometer.

Ingredients: Cake flour, sugar, egg whites, cream of tartar, salt, honey, vanilla extract, sugar, light brown sugar, baking soda, brewed espresso, egg yolks, unsalted butter, and confectioners' sugar

I began by separating the eggs and getting 13 egg whites. I sifted cake flour and sugar in a bowl and set aside.

Sifted cake flour and sugar

With an electric mixer, I whipped the egg whites until foamy. I added the cream of tartar and continued to whip till peaks formed. I then slowly added sugar to the egg whites and continued to whip. Finally, I folded in the flour mixture, salt, honey, and vanilla extract.

Angel food cake batter in the making

I transferred the batter to an angel food cake pan. The cake baked until a skewer inserted near the center came out dry. I inverted the pan and let it cool upside down.

Angel food cake

While the cake cooled, I moved on to the toffee and icing. For the toffee, I combined sugar, brown sugar, and water in a saucepan. I cooked this sugar-water mixture until the sugar dissolved. I continued to cook, without stirring, until the caramel became an amber color. I removed the saucepan from the heat and added baking soda. I poured the toffee onto an oiled baking sheet and let cool.

Making toffee

For the icing, I combined espresso, egg yolks, and sugar in a make-shift double boiler and cooked. I whisked the mixture until it thickened. I then let the espresso mixture cool.

Espresso mixture

Once the espresso mixture cooled, I beat butter with an electric mixer until smooth. I then blended in the espresso mixture.

Blending butter

At this point, I was very close to putting the cake all together. However, my toffee just wouldn't set. After hours in the freezer, I still had a caramel-taffy type texture. Upon further research, I discovered that my "toffee" still had too much water in it and was just not going to set.

I was planning on taking this cake over to a friend's house that night and didn't have time to try making the toffee again. So I decided to assemble the cake with what I had. I ran a knife alongside the cake pan to unmold the cake. Jonathan Waxman instructs to slice the cake into 3 horizontal layers. But out of fear, I decided two horizontal layers would be sufficient.

Two layers of angel food cake

I spread the icing on the bottom layer and drizzled over the caramel/taffy/toffee. I put the top layer on top and repeated. I then using the remaining frosting around the cake. Finally, I dusted with confectioners' sugar.

Angel Food Cake with Toffee Crunch

In spite of not quite getting toffee, I thought the cake was pretty good. The angel food cake was light and delicious. I loved the espresso butter cream frosting. Personally, I'm not a fan of "too sweet" and this frosting was spot on. And even though the toffee ended up as caramel, it was still delicious. Also, Jonathan Waxman instructs putting the cake in the fridge if not serving right away - this is 100 percent spot on. The icing melts quickly.

Overall, what I discovered was the right toffee temperature is just before burning. So now I know. Given that this was my first toffee-making attempt, I would try this recipe again. And hopefully I will actually get some toffee crunch.

Enjoy!

Thursday, September 27, 2012

Salmon with Roasted Garlic Cream Sauce

Recipe: Salmon with Roasted Garlic Cream Sauce
Page: 202
Date Cooked: September 20, 2012

The sauce in this recipe is a take on the mother of all sauces, the classic sauce vin blanc, white wine sauce. It's based on a broth of fish bones, white wine, and other aromatics. It is later enriched with cream or butter. Upon some further research, it appears that the sauce vin blanc is commonly served alongside salmon, as seen in this recipe.

Ingredients: Garlic, unsalted butter, Kosher salt, pepper, white onion, fish bones, parsley, bay leaves, dry white wine, heavy cream, green beans, turnip, radishes, radicchio, red bell pepper, salmon fillets, peas, and olive oil

I began by making the sauce. I cut the top of the garlic head, placed it on a sheet of foil, topped it with butter, and seasoned with salt and pepper. I wrapped the foil and baked the garlic until it was soft.

Garlic head before baking

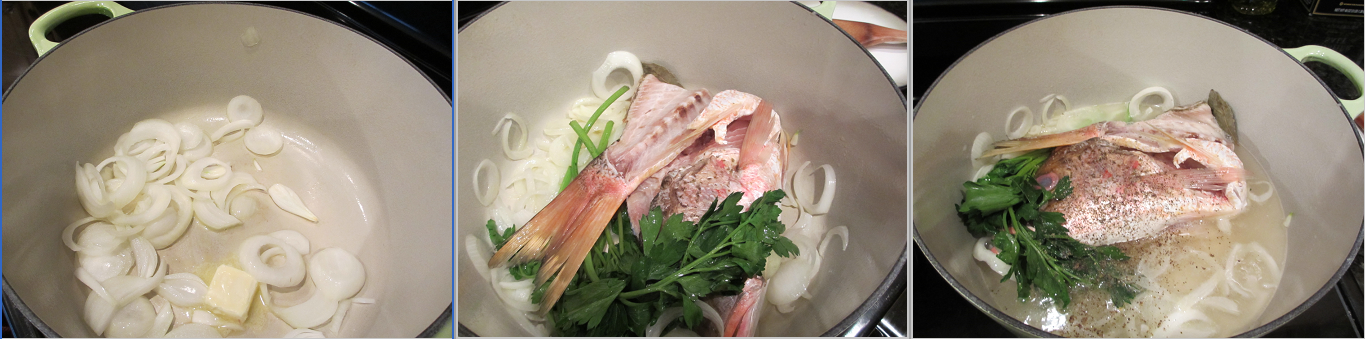
In the meantime, I thinly sliced the onion and rinsed the fish bones in water. I put the onion in a pan with butter and cooked for a few minutes. I then added the fish bones, parsley, and bay leaves; cooking for a little more. I poured in the wine, added black pepper, and let the broth simmer.

Fish bones and white wine broth

I strained the stock into another pan and reduced it down to approximately 1/2 cup of liquid. I squeezed the soft garlic out of the skin and added it to the reduced fish stock. I then stirred in the heavy cream.

Sauce vin blanc

I then proceeded to prep the vegetables. I topped and tailed the green beans; peeled and diced the turnips; trimmed and halved the radishes; cut the radicchio into a julienne; and stemmed, seeded, and cut the red pepper into strips.


Prepping the vegetables

I sprinkled the salmon with salt and pepper. I brushed a baking pan with melted butter, rubbed the salmon with remaining melted butter, and baked the salmon.

Salmon before being baked

While the salmon baked, I blanched all the vegetables in a saucepan of boiling salt water. I drained the vegetables, placed them in a skillet, and set it on the side.

Blanching veggies

When the salmon was done, I set it aside in a warm spot. I reheated the sauce and put the finishing touches on the vegetables. I added olive oil to the vegetables, heated them through, added the radicchio, and seasoned with salt and pepper.

Finishing touches on the vegetables

I placed the salmon on a plate, surrounded it with vegetables, and poured the sauce on top of the salmon. I heated the plate in the oven for an additional two minutes and then served.

Salmon with Roasted Garlic Cream Sauce

This dish was restaurant quality good. Vegetables cooked to perfection - crisp, tender, and the right amount of seasoning. The salmon was amazing. I don't know if I had ever cooked a better piece of salmon before this. The sauce was really flavorful as well, and added just the right amount of fat to the dish. I would make this again. It was beautiful on the plate and tasted great.

Enjoy!

Saturday, September 22, 2012

Apple and Chicken Liver Mouse

Recipe: Apple and Chicken Liver Mousse
Page: 27
Date Cooked: September 16, 2012

When I saw this recipe the first word that came to my mind was "rich." Mousse in general has a rich quality to it, despite its airy texture. Jonathan Waxman's recipe is inspired by an experience he had at a three-star Michelin restaurant in Burgundy. So from the start, I knew the bar was set high.

Chicken livers, sea salt, black pepper, apples, shallots, walnuts, olive oil, bourbon, cognac, heavy cream, and unsalted butter

I coated the livers with sea salt and pepper and set them aside on a plate. I peeled, cored, and diced the apples. I also put the walnuts on a baking sheet to toast lightly in the oven.

1) Chicken livers coated with sea salt and pepper 2) Diced apples 3) Toasting walnuts

I heated olive oil till almost smoking and added the livers, cooking for just a few minutes. Once the chicken livers tuned a mahogany color I removed them from the skillet and put the livers on a plate.

Cooking the chicken livers

I added the apples and shallots to the pan and cooked until the apples got soft. I turned off the heat, poured in the bourbon and cognac. I then stirred in the heavy cream.

1) Cooking apples and shallots 2) Added in bourbon and cognac 3) Stirred in the cream

I combined the livers, the apple mixture, and the toasted walnuts in a blender and pureed through. I then added melted butter along with salt and pepper to taste.

Puree-ing the components of the apple and chicken liver mousse

You can opt to go one step further, and pass the mousse through a fine-mesh sieve to get an even smoother texture. I served the mousse with some white country bread.

Apple and Chicken Liver Mousse

The mousse was a much darker brown that I anticipated and I'm not exactly sure why. But it was delicious. I had to force myself to stop eating it. All the flavors were there - the richness of the butter, heavy cream, bourbon, and cognac...wowsers. The sweetness of the apples worked nicely with those other ingredients. Finally, the meaty/earthy texture of the chicken livers was of course quite prominent. All in all, it was relatively little work for a pretty fancy starter.

Enjoy!